Tuesday, March 27, 2007

GLOSSARY DIGITAL PHOTOGRAPHY

This list will extend your horizon about digital photographyIanguage term which is difficult to be understood.


Autofocus Laboring focus of lens automatically look for focus or not object photographed.

CCD
Charged Coupled Devices. These are the sensors found on many digital cameras used to capture the digital photograph.

CMOS
Complimentary Metal Oxide Semi conductor.
Light censor owning higher resolution than CCD.

EXIF
Exchangeable Image File
enabling data draw like date / photograph time and exposure kept in camera memory card.

Image processor
These are the engines that transform data from the CCD int
o the beautiful pictures that we see.

JPEG
Joint Photographic Experts Group. The committee who originally wrote the JPEG code. It is a type of standardized image file that all compact digital cameras use. Some have additional compressed file types also.

LCD
Liquid Crystal Display. This is the little television screen on the back of digital cameras. It can act as a viewfinder as well as a display screen when playing back images on most cameras.

Noise
The random green and purple dots on digital photographs. The amount of noise increases when the ISO sensitivity is increased and decreases image clarity.

Pixels
Short for ‘picture elements.’ These are the little dots that together, form a digital picture. A megapixel is equivalent to one million dots (pixels).

Photoshop
This is a software program copyrighted by Adobe made for editing digital photographs. There are several versions of the program, from the simplified Elements to the more elaborate CS2. While most digital cameras come with a simple editing software package, Photoshop is the industry leader. The program is even reaching verb status, as in, “That magazine cover is Photoshopped.”

Resolution
This refers to the number of megapixels on the CCD. In general, more megapixels make clearer and sharper pictures. However, there are many other factors that contribute to image quality than just the resolution.

Shutter lag
This is the space of time between the moment when the shutter release button is pressed and when the picture is actually recorded. Cheap cameras can take about a second to register the shot; expensive SLRs hardly have any lag at all.

SLR
Single Lens Reflex. This is the type of camera that professional photographers use because different types of lenses can be attached. The DSLR acronym specifically refers to digital cameras and typically includes larger image sensors. These sensors result in less noise and bette
r quality, but they usually also come with an expensive price tag.

Saturday, March 24, 2007

DIGITAL PHOTO OF THE DAY

JURNALISTIC PHOTOGRAPHY
Photo by: http://solihin-photo.blogspot.com

Camera : Canon PowerShot G5
Shutter speed: 1/640
Aperture / f : 8
ISO/ASA: 100
Flash: flash did not fire (off)
White balance : Auto WB
Location: Surabaya, East Java, Indonesia

Editor Note: Foto diatas diambil ketika SEMBURAN LUMPUR PANAS Lapindo belum parah seperti saat ini. Banyak pengunjung yang ingin melihat secara langsung semburan lumpur panas, namun mereka juga kudu hati-hati. Sampai saat ini korban semburan lumpur panas lapindo masih tidak tahu mau kemana, banyak yang tinggal di pengungsian dan ada juga yang masih memperjuangkan hak ganti rugi atas tanah mereka yang tenggelam. Kemanakah perasaan kita terhadap mereka??? Coba, bayangkan kalau keluarga kita yang terkena!!! Anda bisa melihat foto-foto lainnya di MY PORTFOLIO

Friday, March 23, 2007

DIGITAL PHOTO OF THE DAY

HUMAN INTEREST PHOTOGRAPHY
Photo by: http://solihin-photo.blogspot.com

Camera : Canon EOS 350D DIGITAL
Shutter speed: 1/25
Aperture / f : 5.6
Exposure mode: Auto exposure / AV priority
ISO/ASA: 400
Metering mode: Pattern
Flash: flash did not fire (off)
Lens : 18 - 55 mm
White balance : Auto WB
Location: Senori, Tuban, East Java, Indonesia

Editor note: Foto diatas merupakan aktifitas penjual makanan tradisional. Kondisi sebenarnya saat itu memotret sekitar pukul 5 pagi masih sedikit gelap, sehingga pencahayaan memerlukan speed rendah. Waktu itu saya tidak membawa tripod dan tidak menunggu sampai mentari terbit, lantaran terburu-buru. Disinilah kesabaran untuk menunggu moment ataupun pencahayaan yang tepat diperlukan.

Wednesday, March 21, 2007

KAMERA MEDIUM FORMAT

Kamera Medium Format merupakan kamera yang biasanya menggunakan rollfilm. Besarnya format film pada kamera ini ditentukan oleh panjang foto yang direkam diatas kamera. Pada umumnya format film pada Kamera Medium Format dimulai dari format film 4,5X6, 6X6, 6X7, 6X8, 6X9, atau ada juga panorama kamera dengan format sampai dengan 6X17.

Pada umumnya pemakaian kamera dengan format ini jarang sekali ditemui pada kebanyakan penggemar fotografi, ini dikarenakan harga film serta pencetakan film yang agak mahal dibandingkan dengan kamera jenis SLR. Kelebihan dari kamera medium format ini adalah pada kualitas hasil foto yang bisa dicetak dengan ukuran besar, sehingga kebanyakan kamera ini dipakai untuk tujuan komersial atau reproduksi seperti foto untuk pemasangan iklan di poster, baliho, billboard, dsb.

Sementara itu ada juga kekurangan atau hambatan dari pemakaian kamera jenis ini, yaitu harga peralatan yang relatif mahal, adanya keterbatasan dalam depth of field (DOF) pada lensa dengan sudut gambar yang sama. contohnya pada kamera SLR anda memerlukan lensa 35mm untuk mendapatkan kurang lebih sudut pemotretan sekitar 80 derajat, untuk mencapai sudut pemotretan yang sama anda harus memakai lensa 65mm pada kamera medium format dengan format film 6X6. Tentunya anda bisa membayangkan dengan lensa 65mm anda mempunyai daerah depth of field yang lebih kecil dibandingkan lensa 35mm, akibatnya untuk mendapatkan daerah DOF yang setara dengan lensa SLR harus memilih rana yang lebih besar dan konsekuensinya harus menyesuaikan kecepatan pencahayaan (lebih rendah dari kamera SLR) yang tentunya pada motif tertentu sangat menghambat pemotretan.

Dengan menggunakan kamera medium format, setidaknya anda belajar untuk berpikir sebelum memotret apakah motif serta pencahayaan yang anda pilih sesuai, karena bila salah memprediksikan akan membuang film yang mana harga film kamera medium format ini lebih mahal. Dibandingkan dengan kamera yang menggunakan Film format 135, harganya relatif murah dan maximal motret sampai 36 frame dalam satu rolfilm, sementara film format 120 untuk kamera medium format dengan format 6X6 hanya dapat memotret sebanyak 12 frame. Ingin mencoba beralih ke pemotretan dengan kamera medium format ?

STORY ABOUT DIGITAL KAMERA

Pembuatan kamera digital mulai marak sejak awal tahun 1990-an, namun dari kamera-kamera yang dihasilkan belum ada yang layak pakai. Masalah yang timbul adalah resolusi. Di awal tahun 1990-an, resolusi kamera digital masih jauh dibawah 1 megapixel. Sebagai gambaran, untuk membuat foto seukuran majalah, paling tidak dibutuhkan kamera dengan kemampuan rekam 2 megapixel.

Pada tahun 1994, fuji bekerjasama dengan Nikon meluncurkan Fuji-Nikon E-2. kamera ini secara umum sudah mencukupi kebutuhan jurnalisitik, yaitu sekitar 1,3 megapixel. Foto yang dihasilkan disimpan dalam sebuah kartu hardisk PCMCIA.

Kalau membicarakan kekurangan kamera E-2, juga E-2S, adalah pada sarana penyimpanaannya yang terbatas. Maka, setelah kartu-kartu memori berkapasitas tinggi muncul, juga setelah resolusi kamera digital meningkat tajam, era digital memang seperti tidak punya rem lagi.

Saat ini, kamera digital dari yang untuk keperluan sehari-hari dengan resolusi 1 M samapi kamera yang resolusinya belasan Megapixel ada di pasaran. Sarana penyimpanan foto pun sudah hampir tidak ada batas karena flash card berkapasitas 8 gigabyte sudah dibuat.

Dengan beralihnya fotografi konvensional ke digital, banyak sekali hal yang dimudahkan. Kini kita tidak disibukkan lagi dengan penyimpanan negatif film/slide yang sangat banyak. Dalam satu rol film isi 36, belum tentu ke-36 frame disana berguna. Tapi biasanya frame-frame tidak berguna itu terpaksa tetap disimpan untuk keutuhan film itu sendiri agar rapi dan tidak tercerai-berai. Dalam fotografi digital, kita bisa hanya menyimpan yang diperlukan. Saat mencari yang kita butuhkan pun, dengan bantuan fasilitas search, sebuah foto digital sangat mudah ditemukan lagi.

Selain itu, negatif atau slide (terutama yang berwarna) akan mengalami degradasi mutu dan warna sejalan dengan waktu sebagus apapun kita menyimpannya. Foto digital, selama sarana penyimpanannya tidak rusak, tetap mempunyai data seperti saat pemotretan. Warna foto digital karena disimpan dalam bentuk angka, tetap bertahan sampai kapanpun.

Sebagai gambaran kepraktisan foto digital, bisa dilihat perbandingan ini. Seratus foto konvensional ukuran kartu pos membutuhkan tempat penyimpanan kira-kira sebesar 10x15x3 cm. Sedangkan dalam bentuk data digital, 100 foto ukuran kartu pos itu tidak sampai memenuhi setengah kapasitas sebuah CD 700 MB dengan pemadatan normal.

DIGITAL PHOTO OF THE DAY

COMPANY PROFILE PHOTOGRAPHY
Photo by: http://solihin-photo.blogspot.com

Camera : Minolta DiMAGE 7 Hi
Shutter speed: 1/30
Aperture / f : 3.5
Exposure mode : Manual
ASA/ISO : 200
Flash : Flash fired (on)
White balance : Auto WB
Focal Length : 28 mm
Metering mode : Pattern
Location : Class of modelling school, Surabaya, East Java, Indonesia.

Editor note: Foto diatas merupakan gambaran foto suasana dalam kelas, seberapa banyak peserta yang hadir dan bagaimana seorang instruktur beraksi. Untuk dapat menggambarkan semua peserta kelas, saya mengambil gambar dari atas (dengan naik kursi) agar peserta dapat masuk semuanya di frame. Dan menunggu aksi dari seorang instruktur agar lebih hidup.

Tuesday, March 20, 2007

GARUDA PHOTO COMPETITION

Sebagai wujud kepedulian terhadap perkembangan pariwisata Indonesia dan kekayaan alam wisata budaya Indonesia, Garuda mengadakan lomba foto dengan hadiah total Rp. 100.000.000,-.

Tema Lomba :

Foto Alam Wisata & Budaya Indonesia Serta Keunikannya

Peserta
  1. Lomba Terbuka untuk Umum
  2. Pria dan Wanita
  3. Warga Negara Indonesia, Kitas & Kims

Kategori

  1. Kategori Umum
  2. Kategori Pelajar
  3. Kategori Kamera Handphone
  4. Kategori Wild Card

Syarat:

  1. Pemotretan dilakukan dengan media digital.
  2. Foto yang disertakan harus merupakan karya asli, dan belum pernah diikutsertakan pada lomba foto lainnya.
  3. Karya foto yang digunakan untuk penjurian, dapat dikirim dalam bentuk :

    FILE

    1. Dalam format JPEG, dengan ukuran sisi terpanjang maksimal 1200 pixel, sisi terpendek minimal 400 pixel, sisi panjang + sisi pendek = harus lebih dari 1400 pixel.
    2. Nama file adalah paduan nama peserta dan judul karya. Misalnya :

      Nama Peserta : Johnny Santoso
      Judul Karya 1 : Candi Borobudur, nama File : J_Santoso_CandiBorobudur.jpg
      Judul Karya 2 : Pantai Nias, Nama file : J_Santoso_PantaiNias.jpg

    3. Dikirim melalui email ke alamat : promotion@indomultimedia.co.id
    4. Atau dalam bentuk CD, dikirim dalam amplop tertutup, tulis di sudut atas amplop “GIM Photo Competition
    5. Untuk pengiriman karya foto dengan penggunaan Camera Handphone dapat dilakukan melalui email
    6. Cantumkan Indentitas Diri :
      1. Nama, alamat, no telepon dan handphone yang dapat dihubungi, serta profesi pemotret
      2. Judul karya foto
      3. Tanggal dan lokasi pemotretan

    PRINT/CETAK

    1. Karya foto dicetak dengan ukuran sisi terpanjang maksimal 45 cm, sisi terpendek minimal 15 cm, sisi panjang + sisi pendek = harus lebih dari 50 cm.
    2. Tuliskan nama, alamat dan no. telepon serta judul karya pada selembar kertas dan ditempelkan dibalik karya foto.
    3. Masukkan dalam amplop tertutup, tulis di sudut atas amplop “GIM Photo Competition”.
    4. Tuliskan pada selembar kertas (tempelkan di belakang karya foto) indentitas diri :
      1. Nama, alamat, no telepon dan handphone yang dapat dihubungi, serta profesi pemotret
      2. Judul karya foto
      3. Tanggal dan lokasi pemotretan
  4. Pengiriman CD dan foto cetak ke alamat :

    Indo Multi Media
    Globe Building 2nd Fl.
    Jl. Buncit Raya kav. 31-33
    Jakarta 12740

  5. Olah Digital diperkenankan, dengan mencantumkan keterangan olah digital yang digunakan pada hasil karya foto. Termasuk penggabungan 2 buah foto atau lebih
  6. Penjurian lomba foto ini terdiri dari dua babak yaitu babak semifinal dan babak final
  7. Pengiriman foto paling lambat tanggal 15 Mei 2007 untuk babak Semifinal
  8. Karya foto pemenang menjadi milik pihak panitia dan tidak dapat dikembalikan. Panitia berhak menggunakannya untuk keperluan publikasi dan promosi
  9. Untuk foto yang tidak menang tetapi dimanfaatkan untuk kepentingan pihak panitia akan diadakan pembicaraan dengan pemilik foto. Untuk itu harap disiapkan file dengan ukuran sekitar 6MP, dengan resolusi 300dpi
  10. Setiap karya foto peserta lomba dapat ditampilkan di majalah dan atau website Garuda Inflight Magazine tanpa pemberitahuan sebelumnya untuk keperluan penyelenggaraan lomba
  11. Pemenang diwajibkan menyerahkan hasil karyanya dalam bentuk CD (dengan file size sekitar 6MP, pada resolusi 300 dpi) yang akan digunakan untuk pembesaran foto untuk keperluan pameran
  12. Peserta dibolehkan mengirim lebih dari satu karya foto dan tidak dipungut biaya
  13. Keputusan Juri adalah mutlak dan tidak dapat diganggu gugat
  14. Pajak pemenang ditanggung oleh pemenang

Dewan Juri terdiri dari

  1. Goenadi Haryanto (Fotografer)
  2. Arbain Rambey (Kompas)
  3. Johnny Santoso (Garuda)
  4. Doddy Tjarma (Garuda)
  5. Jan Dekker (Garuda Inflight Magazine)

MEKANISME
I. Babak Semifinal : Februari – April 2007

  1. Pengiriman materi dilakukan dari tanggal 1 Februari sampai dengan 30 April 2007
  2. Penjurian dilakukan pada bulan Mei
  3. Pada bulan Mei juga dilakukan pemberitahuan kepada 15 pemenang dan setiap pemenang akan dikirimkan surat pemberitahuan
  4. Pada bulan Mei juga akan dilakukan pengurusan administrasi untuk babak semifinal

II. Bulan Juni 2007

  1. Pengumuman pemenang GIM edisi Juni 2007
  2. Penayangan foto-foto pemenang (semifinalis)

III. Babak Final : Juni – Agustus 2007

  1. Semifinalis berjumlah 15 orang
  2. 15 semifinalis akan terbagi dalam 5 kelompok, yang masing-masing kelompok terdiri dari 3 orang
  3. 5 kelompok tersebut akan dikirim ke tujuan wisata yang telah ditetapkan : Jakarta, Bali, Medan, Balikpapan, Makasar (tba)
  4. Pengiriman para semifinalis ke daerah wisata yang telah ditetapkan bertujuan untuk menguji keahlian mereka dalam menciptakan sebuah karya foto
  5. Pengiriman materi diberi waktu selama 3 bulan dari Juni sampai dengan Agustus 2007
  6. Penjurian dilakukan pada bulan September 2007

HADIAH
Semifinal

  1. 15 orang semifinalis, masing-masing :
    Serifikat + Uang Tunai Rp. 1.000.000,- + Tiket Garuda Indonesia (dengan tujuan wisata yang telah ditetapkan)

Final

  1. 3 Pemenang :
    Gold : Sertifikat + Rp. 10.000.000,- + tiket Garuda Indonesia
    Silver : Sertifikat + Rp. 7.500.000,- + tiket Garuda Indonesia
    Bronze : Sertifikat + Rp. 5.000.000,- + tiket Garuda Indonesia
  2. 3 Juara Harapan :
    3 orang pemenang dengan masing-masing hadiah :
    Serifikat + Uang Tunai Rp. 2.500.000 + Tiket Garuda Indonesia
  3. HP Award
    1 orang : Sertifikat + Rp. 2.500.000,- + Tiket Garuda Indonesia
  4. Student Award
    1 orang : Sertifikat + Rp. 2.500.000,- + Tiket Garuda Indonesia
  5. Beginners Award
    1 orang : Sertifikat + Rp. 2.500.000,- + Tiket Garuda Indonesia
Source: http://www.garudamagazine.com/photocompetition.php

DIGITAL PHOTO OF THE DAY

Jurnalistic Photography
Photo by: http://solihin-photo.blogspot.com

Camera : Nikon Coolpix E995
Shutter speed : 1/321
Aperture : 6.0
Flash : Flash did not fire (off)
ASA/ISO : 100
Exposure Compensation : 0
Location : Surabaya, East Java, Indonesia

Editor Note: Fotografi jurnalistik saat ini memang nge-trend karena banyak media yang membutuhkannya. Memotret foto jurnalistik membutuhkan banyak latihan di lapangan, karena obyek yang difoto terkadang selalu dinamis dan cepat berubah. Pertama lihatlah obyek apa yang difoto, kemudian cari titik fokus yang menarik dari sekian banyak angle obyek yang mau difoto. Letakkan dalam frame obyek apa saja yang harus masuk, jangan sampai latar belakang (BG) mengaburkan titik fokus utama. Carilah yang ekspresif dan ingat 5W + 1H

Monday, March 19, 2007

DIGITAL PHOTO OF THE DAY

Wedding Photography
Photo by: http://solihin-photo.blogspot.com

Camera : Canon Powershot S1 IS
Shutter speed : 1/400
Aperture/f : 4.5
Exposure bias value : 0
Metering mode : Pattern
Flash : Flash did not fire (off)
Exposure mode : Manual
White balance : Auto WB
ASA/ISO : 100
Location : Banyuwangi, East Java, Indonesia

Editor note : Thank's for yudi family, especially couple of andre and of novi.

Saturday, March 17, 2007

GLOSARIUM PHOTOGRAPHY

Ketika belajar fotografi, anda akan menemui istilah-istilah yang ada dalam fotografi. Terkadang anda tidak tahu istilah-istilah fotografi yang ada. Nah, berikut ini daftar-daftar istilah fotografi. Semoga bermanfaat.

Aperture

Di belakang lensa kamera digital terdapat iris berbentuk bundar yang membuka dan menutup (bukaan diafragma), untuk menentukan banyaknya cahaya yang masuk dalam kamera. Mengubah aperture/diafragma berarti juga mengubah depth of field (ruang ketajaman).

Aperture priority
Istilah ini mengacu pada opsi pencahayaan yang bersifat semi-manual. Sipemotret mengatur diafragma menurut ruang ketajaman yang dikehendaki, dan sistem pengukuran mengatur kecepatan rana guna memperoleh pencahayaan yang tepat.

Available light
Pencahayaan yang apa adanya.

AE Lock
Auto-exposure lock. Fitur ini membantu anda melakukan pembacaan light-meter atas suatu bagian gambar/foto, dan selanjutnya mempertahankan setting pencahayaan tersebut disaat anda memotret.

Autofocus
Fokus lensa yang bekerja secara otomatis mencari fokus atau tidak suatu obyek yang difoto.

Backlight
Pencahayaan yang berasal dari belakang obyek

Blitz
Flash atau lampu kilat sebagai alat bantu yang memancarkan sinar/cahaya buatan untuk menerangi obyek yang difoto.

Bracketing
Menaikkan atau menurunkan ukuran pencahayaan pada pemotretan untuk mendapatkan ukuran pencahayaan yang tepat.

Bounce
Lampu kilat yang dipantulkan keatas atau kesamping untuk mendapatkan efek pencahayaan pada obyek yang difoto.

Bulb
Pengaturan kecepatan rana/shutter speed yang dapat diatur sendiri sesuai dengan keinginan si pemotret.

Calibration
Mengubah setting sesuatu alat agar memenuhi standar. misalnya, kalibrasi sebuah monitor dapat dilakukan agar apa yang ditayangkan pada layar tampak akurat.

Centre-weighted metering
Proses ini berlangsung ketika kamera membaca cahaya yang menyinari seluruh bingkai, dengan berpedoman pada apa yang ada ditengah-tengah gambar.

CCD
Charge couple Device. Sensor cahaya yang ada didalam kamera yang merekam gambar. Sensor ini terdiri atas jutaan sensor kecil cahaya, tiap sensor untuk tiap pixel. Besar kecilnya CCD diukur dalam satuan yang disebut dengan 'megapixel' . Semakin besar megapixelnya semakin baik gambar yang dihasilkan.

CMOS
Complimentary Metal Oxide Semi conductor. Sensor cahaya yang memiliki resolusi lebih tinggi daripada CCD.

CMYK
Cyan, Magenta, Yellow, Black. Warna-warna yang digunakan untuk pencetakan empat warna guna menciptakan warna-warna lainnya. Sistem ini berbeda dari RGB yang diterapkan pada komputer dan kamera digital.

Depth of field
Ruang ketajaman, yaitu ketika anda memotret suatu obyek, ada benda-benda dilatar depan dan belakang yang juga masuk dalam fokus. Jarak antara benda terdekat dan terjauh itulah yang disebut ruang ketajaman. Dengan memperkecil diafragma/aperture berarti anda memperbesar ruang ketajaman.

Digital zoom
Beberapa kamera digital dapat dapat melakukan zoom-in (mendekatkan/membesarkan) terhadap obyek atau gambar secara digital. Area yang di-zoom memang menjadi lebih besar, tetapi dengan jumlah pixel yang sama sehingga gambar tampak pecah. Ini jelas berbeda dengan optical zoom lens.

dpi
Dots per inc (titik per inci). Kualitas printer foto ditentukan oleh jumlah butiran tinta per-inci dari gambar yang dihasilkan.

Effective pixels
Suatu kamera digital dapat saja dinyatakan memiliki 3.34 megapixel pada CCD-nya, namun untuk memotret tidak semuanya dipakai. Sejumlah pixel diberi warna hitam untuk keseimbangan warna, sedangkan pixel-pixel lainnya berada diluar range lensa. Pixel-pixel efektif adalah yang digunakan untuk memotret.

Exposure
Pencahayaan dari hasil pengaturan bukaan diafragma dan kecepatan rana, dimana bila anda memotret dan hasil foto terlalu gelap itu berarti under exposed, dan over exposed bila hasil foto terlalu terang.

EXIF
Exchangeable Image File (EXIF) memungkinkan data gambar seperti tanggal/waktu pemotretan dan exposure disimpan dalam kartu memori kamera.

Emulsi film
Lapisan bahan pada film yang peka terhadap cahaya.

Fill in flash
Cahaya tambahan yang berasal dari lampu kilat eksternal, lampu biasa atau reflektor, dan digunakan untuk 'melembutkan' area yang terkena bayangan yang berasal dari lampu kilat utama yang lebih terang.

f-number/f-stop
Adalah perbandingan/rasio diafragma suatu lensa kamera dengan focal length / jarak titik bakarnya. Lensa berkualitas tinggi mempunyai f-number / angka f yang lebih kecil, artinya memiliki diafragma yang lebih besar, sehingga lebih banyak cahaya yang dapat masuk kedalam lensa. Seperti f/22, 16, 11, 8, 5.6, 4, 2, dst.

Fish eye lens
Lensa sudut lebar dengan ukuran dibawah 16 mm yang memungkinkan anda memperoleh pandangan luas untuk memotret, seperti memotret gedung pencakar langit dapat masuk semua kedalam lensa sekaligus jalanan didepan gedung.

Focus
Ketajaman suatu gambar pada jendela bidik yang merupakan titik api pertemuan cahaya melalui lensa.

Front light
Pencahayaan yang berasal dari depan obyek.

Focal length
Jarak titik api. Daya pembesar yang ada pada lensa. Semakin jauh jaraknya semakin besar daya pembesarnya. Sebaliknya, semakin kecil daya pembesannya, semakin luas sudut lebar lensanya. Bermain-main dengan focal length dapat memberikan manfaat.

Grain
Butiran lapisan emulsi film yang akan tampak seperti titik-titik pada hasil cetak foto. Bila menggunakan ASA fil m tinggi seperti 400, 800, 1600, 3200, maka titik-titik pada hasil cetak foto terlihat besar.

Hair light
Efek pencahayan yang jatuh pada bagian rambut si model.

ISO/ASA/DIN
International Organisation for Standardisation/American Standard Association/ Deutsche Industrie Norm. Dalam dunia fotografi digital, ISO/ASA/DIN adalah suatu istilah yang digunakan untuk menyatakan kepekaan cahaya pada CCD kamera. ISO/ASA diantaranya 100, 200, 400, 800, 1600, 3200.

Lightmeter
Alat pengukur cahaya yang ada pada kamera yang dapat membantu untuk pengukuran cahaya yang tepat.

Megapixel
Satuan ukuran untuk menentukan detil gambar yang bisa ditangkap kamera digital. 1 megapixel berarti gambar disusun atas satu juta dot (pixel). Semakin tinggi megapixelnya, semakin baik gambar yang dihasilkannya.

Optical zoom
Banyak kamera digital yang menggunakan lensa-lensa zoom optical berukuran kecil. Tanpa mengurangi kualitas gambar (seperti yang terjadi pada zoom digital), lensa tersebut dapat digunakan untuk membesarkan obyek (zoom in), dan juga untuk memotret sasaran dengan sudut lebar (zoom out).

Over exposure
Pemotretan dengan hasil pencahayaan yang berlebihan pada obyek yang difoto. Sehingga hasil foto yang nampak terlalu terang.

Prosumer
Istilah yang secara luas mengacu pada kamera kompak digital yang dilengkapi dengan sederetan pengontrol manual, yang beberapa diantaranya juga merupakan fitur-fitur yang ada dalam kamera SLR. Kamera jenis ini memiliki kemampuan memotret sesuai standar profesional dan biasanya memiliki resolusi minimal 5 megapixel.

Resolution
Ukuran ketajaman gambar yang ditentukan oleh banyaknya detil gambar pada monitor atau hasil cetak. Makin tinggi resolusinya makin bagus. Untuk monitor, resolusi 1024 x 768 pixel lebih bagus daripada 800 x 600 pixel. Pada hasil cetak, resolusi 1200 dpi (dots per inc) lebih bagus daripada 600 dpi dan yang lebih rendah.

Red eye
Efek titik merah pada mata obyek karena penggunaan lampu kilat.

Reflector
Alat bantu pemotretan yang berfungsi untuk memantulkan pencahayaan dari lampu kilat, lampu, sinar matahari sehingga akan menghasilkan pencahayaan pada obyek yang lebih merata.

Shutter priority
Modus semi manual yang memungkinkan anda menentukan kecepatan rana, sementara kamera secara otomatis mengatur diafragma, agar diperoleh pencahayaan yang tepat.

SLR
Single Lens Reflex. Cermin atau prisma yang memantulkan cahaya yang masuk melalaui lensa menuju jendela bidik, sehingga ketika anda melihat jenedela tersebut, anda dapat melihat sama seperti apa yang dilihat oleh kamera.
Sistem ini hanya terdapat pada kamera-kamera digital high end saja.

Spot-metering
Modus ukuran ini dpat membantu anda membaca cahaya dari area kecil ditengah-tengah bingkai. Pembacaan cahaya merupakan cara terbaik guna mengatasi pencahayaan yang rumit.

Self timer
Alat yang tersedia di kamera yang digunakan mengatur waktu untuk kamera men-shutter/jepret sendiri.

Shadow
Bidang gelap atau bayangan pada obyek yang terjadi karena penggunaan langsung lampu kilat ke obyek.

Side light
Pencahyaaan yang berasal dari samping obyek.

Still life
Pemotretan benda yang tidak bergerak/benda mati, seperti patung, makanan, minuman, boneka, aneka benda-benda kecil, produk-produk kecantikan, dsb.

TLR
Twins Lens Reflex atau reflek lensa kembar yaitu pembidikan dilakukan secara vertical pada bagian atas lensa dan tidak langsung ke lensa utama.

Under exposure
Hasil gambar pemotretan yang kurang pencahayaan pada obyek, sehingga hasil fotonya cenderung gelap.

View finder
Jendela bidik. Tempat untuk melihat obyek yang ada pada kamera.

White balance
Cara kamera digital menyesuaikan diri terhadap kondisi pencahayaan. Pada umumnya kamera memiliki pilihan pre-set, seperti Sunny dan Cloudy.

SOFTWARE PHOTOGRAPHY

Adobe Photoshop CS3 Public Beta
The importance of the new pu
blic beta - a photographer’s perspective

For fotografer, photoshop represent its darkroom of photography. With photoshop, a fotografer can edit result of its photos. Adobe photoshop launch newest version that is adobe photoshop CS3. Following appearance of photoshop CS3 from photographer's perspective by Mark Galer. Or visit on site photoshopsupport.

Many photographers who have tried to run Bridge and CS2 using a Mac laptop have found that it can be a painfully slow process. It usually requires that they run only one of the applications at any one time - which sort of defeats the purpose of the Bridge/Photoshop relationship. For many photographers the need to shoot and manage memory intensive RAW files has only added to the burden. Adobe has not been deaf to this pain and has released this public beta to ease/erase the pain for this part of the Photoshop community. PC owners have not been left out in the cold this Christmas, and will also get to enjoy the new features ahead of time as well.

A known bug - brush-size for MacIntel users
The Photoshop CS3 Beta can run on a Mac using a G4 or G5 processor or on a new Mac using the new Intel Core Duo processor. Applications that have not yet been updated to run on a Mac using the new Intel processors run under an emulation mode called ‘Rosetta’. If you are using Photoshop CS2 on a new Mac you are currently opening the software using Rosetta. New applications that have been designed to run on the new Intel processors are said to run ‘natively’, i.e. they don’t need to open using the Rosetta emulation mode. This is where the Mac user gets the speed increase they have been waiting for.

I am currently running Bridge natively on my Mac Book (using the new speed advantage of the Intel processor). I am however choosing to run Photoshop CS3 in emulation mode (Rosetta). I have opened up the ‘Info’ window for the Photoshop CS3 application file, and have checked the box that says ‘Open using Rosetta’. I have had to do this due to the fact that the brush-size cursor is not currently working in the Photoshop CS3 beta, for the Mac user running the application natively (you only get a cross hair no matter what the size of your brush is). If you don’t paint then you can take full advantage of the speed of the new processor, and run Photoshop CS3 natively. If like me however brushing is a major part of your photo-editing work then you will also need to consider running Photoshop CS3 using Rosetta.

Lets put ‘the need for speed’ aspect aside for a moment and look at one of the most popular questions I usually hear around the release of a new version of Photoshop (even if this is not strictly the release time, and the beta version you will be downloading now is not the version that will go on sale next year).

“Does this new version of Photoshop represent a major or a minor upgrade?”
Professional photographers, believe it or not, don’t always upgrade every time there is a new version of Photoshop. Adobe, of course, say that all versions of Photoshop have been important revisions in the history of the software, as they don’t ‘slack off’ during any single developmental period. There are versions, however, when the feature set that is implemented has a significant effect on the photographer’s workflow. In this current climate of change, where implementing and managing an effective digital workflow is critical to the success of a commercial photographer, this new release does indeed represent a significant step forward for photographers. Although a lot of the new features in this release can be found in other applications, what is significant for this release is the way that Adobe has integrated them into a single software package and created a more effective workflow.

Photo Downloader
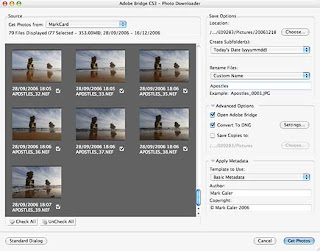
We have many new features, and a new interface with the public beta of Photoshop CS3 but which are the features that will have a significant impact on my own workflow? As a Mac laptop-wielding photographer, often working on location, the first thing to a have a significant impact on my workflow would have to be the new Photo Downloader. This downloader has made an appearance in the public beta of Photoshop Lightroom and in Photoshop Elements for PC users, but has only now made an appearance in Bridge.


This dialog box (that can be trained to self launch as soon as it detects a memory card) can now import the images directly into Bridge. Not only can we import the images straight into Bridge but we can also rename, convert to DNG, save copies to an external drive, sort into sub-folders and embed copyright info all at the time of import. If you have been using Bridge 1.0 to perform these tasks individually you will immediately recognize that this feature is a big time-saver for those photographers who are handling and processing hundreds of images on a daily basis.

Bridge CS3

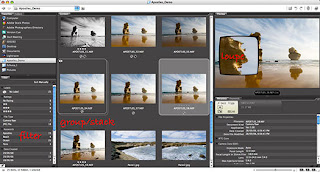
The next time-saving feature photographers will notice in the new and faster Bridge, is that it also offers many features to render the process of sorting, and ranking images more efficient. We now have the ability to compare two or more photographs in the preview window without having to open them or create a second Bridge window and this preview is no longer limited in size. We also now have the ability to use a loupe tool to gain a 1:1 view (actual pixels) of a portion of the image to check focus and small details. This feature will reduce the number of times the photographer opens an image into Adobe Camera RAW only to find the focus is not absolutely sharp.


Once the sorting and ranking of images is underway photographers can now filter the images not only by rank, but also by numerous other differences such as file type, file orientation, format etc. After picking favorites the photographer can then group (or stack) similar images with the preferred thumbnail on top and the lower ranked images stacked behind the favorite image. This is a great way to start reducing the visual clutter in a folder of images and make the hero images more prominent in the folder. In my opinion this newly improved workflow is worth the upgrade itself.

Adobe Camera RAW 4.0 (ACR 4)
Once an image is open in the new Adobe Camera RAW 4.0 photographers will very quickly appreciate and grow to love the new Recovery and Fill Light sliders. These sliders (that first saw the light of day in Photoshop Lightroom) allow the photographer to very quickly increase the exposure in underexposed shadows and recover highlight information that may otherwise become clipped.


The extended dynamic range of the RAW format is probably THE biggest reason that many professional photographers now choose to shoot in the RAW format. Having a single slider called Recovery (rather than having to juggle the Exposure and Brightness sliders) will be a major time saving feature in the new CS3 workflow. There are many other new sliders in ACR 4 interface that allow the photographer to manipulate tonality and color in new ways before an image is opened in Photoshop or batch processed. Black and White conversions are now much more controllable in the ACR space and the overall improvements can only get better and better before ACR 4 is finally released next year (you have to keep reminding yourself that what you see now, is only work-in-progress).

New User Interface (UI)
The new UI may disturb or annoy some Photoshop users at first as they realize they will have to navigate their way around a new working environment. It’s about as inconvenient as buying a new camera and then hunting for the location of all the usual buttons – that are now in slightly different places.


I have to admit that I was not an instant convert to the new workspace, but now that I have been working with it for some time I find that I have more space dedicated to the image that I am editing, and I have learnt to work smart. I have finally realized the new UI can be organized so that it works smart, and not get in the way of my editing workflow. Once you get comfortable with this new environment and spend some time organizing the space to meet your own needs you will not want to go back.

New to Photoshop CS3

The new features inside CS3 are a mixed bag - not all users will use all of the new features, but I have to say that just the speed and efficiency of Bridge CS3 and ACR 4 makes running the beta now, on a daily basis, a very tempting proposition.

The significant new and changed features in the Photoshop CS3 editing space include:

1. Auto-Align Layers and Auto-Blend Layers (NEW)
The greatly improved Photomerge feature utilizes the combined features of the new ‘Auto-Align Layers’ and ‘Auto-Blend Layers’ that can now be activated independently from the Edit menu. Photomerge was never really up to the task of creating seamless stitches – even if the auto exposure and auto white balance were turned off in the camera before capturing the component images.

The new Auto-Blend layers can, however, create seamless stitches (using layer masks) with component images where exposure and minor color differences exist (the result of using auto white balance). For many photographers this will end the need for specialized software or slow manual stitching tasks. Although this feature is not in the same ballpark yet as ‘RealViz Stitcher’, the all new Photomerge will enable photographers to carry on shooting when they are faced with a situation where their wide-angle lens is just not wide enough without having to worry about the complexity of the post-production editing task. The client will probably be hard pressed to spot that the final image is a montage of several images.

2. Brightness/Contrast (IMPROVED)
This is probably a minor revision for experienced Photoshop users and will probably not affect many photographers who have been educated not to use this adjustment feature due to its destructive nature. The destructive nature has now, with Photoshop CS3, been turned off by default.

The Brightness Contrast sliders now operate in the same way as the sliders, that bear the same name in the Camera RAW dialog box. When the brightness slider is moved higher the gamma, or midtone, values in the image are made brighter, without clipping the highlight tones, and without rendering the darkest shadows tones too light. When the Contrast is increased in this dialog box it is now similar to creating an ‘S’ curve in the Curves dialog box, without moving the white and black points within the image.

For lovers of the old destructive nature (there is probably a few out there) the user can simply click on the ‘Use Legacy’ check box. For new users of Photoshop the new non-destructive nature of this adjustment feature will be of enormous benefit, until they graduate to the Levels and Curves adjustment features.

3. Curves (IMPROVED)
The Curves dialog box offers a significant improvement. The user can now see the histogram and check tonal clipping within this dialog box. This allows the photographer to bypass the Levels dialog box altogether if they so wish and simply set the black point and white point within the Curves dialog box before proceeding to manipulate the tonality and color by adjusting the curves.

The changes to each of the component channels can now be viewed in the master RGB view, and the changes can be saved as a custom preset that can be accessed from within the dialog box, rather than being saved and loaded to and from a remote location.

4. Device Central (NEW)
If you need to prepare visual information for a mobile device this new feature may be of interest to you. If you don’t you will probably never have a reason to go here.

5. Black & White (NEW)
This new adjustment feature (also available as an adjustment layer) is probably the easiest and most versatile way to convert images to Black & White. No more juggling sliders in Channel Mixer to prevent clipping and no clever techniques (such as Russel Brown’s dual Hue/Saturation layers technique) to implement this process.

The adjustment feature is a breeze to use and very versatile. You can use the color sliders if you like or simply click on a color within the image window and drag to the right to make lighter or to the left to make darker. How easy is that!

6. Smart Filters (NEW)
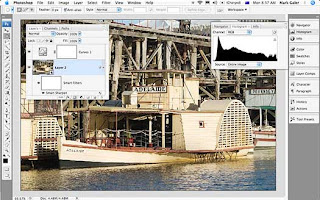
For those who learnt to love the non-destructive nature of Smart Objects (perhaps just a small minority at this point in time) then you will simply love the fact that we can now filter these Smart Objects in a non-destructive way in CS3. You can apply a filter to a layer and then change the filter values further down the track, without having to revert to the original file or create another background copy layer. This will be particularly useful for sharpening images for print.

If you convert the layer to a smart object before applying the Unsharp Mask, or Smart Sharpen filter, it will simply be a matter of double clicking the filter component of the layer to re-open the filter dialog box, and change the settings to more appropriate values, if the output device or medium ever changes. For advanced editors this will open a whole new way to edit and re-edit images. RAW images could be opened as Smart Objects in CS2 but now that we can filter these layers with Smart Filters the era of a totally non-destructive editing workflow is about to dawn for many users.

7. Quick Selection and Refine Edge (NEW)
The tragic wand suddenly doesn’t look remotely magic anymore. This is an intelligent wand that adapts its tolerance as it moves around your image. For the casual Photoshop user this may represent a significant new tool in your workflow. For the advanced user who creates selections with graphics tablets, via channels or with the Pen Tool I suspect that this tool will fail to impress, or indeed change the way you currently make your selections. Similarly the Refine Edge tool is a quantum leap forward from the Modify commands in the Select menu.

The Refine Edge dialog box offers visual feedback when you refine the quality of the edge selection so that your retouching or montage work is undetectable. For Advanced users who use a Levels adjustment on their layer masks to refine edge quality (a technique outlined in the Photoshop CS2: Essential Skills book) I suspect that the Refine Edge dialog box will gather cobwebs along with the Dodge and Burn Tools.

8. Clone Source and ‘Ignore adjustment layers’ option (NEW)
This new palette may help many who use either the Clone Stamp Tool or the Healing Brush Tool in their daily workflow. After Option clicking (Mac) or Alt clicking (PC) to set the source of the pixels we can now see an overlay of these pixels at a reduced opacity as we move over the part of the image that we want to adjust or modify. I personally will be still using my Super Stamp technique that I highlighted in one of my recent podcasts, where the Stamp Tool within Vanishing Point is used to clone pixels, rather than the Clone Stamp Tool in the main editing space.

This new clone source palette will not replace the technique I currently use, as the Clone Stamp Tool within the current public beta still has no option to ‘heal’. For many users the myriad of options to set multiple clone points, scale and rotate the cloned pixels, set blend modes for the overlay at reduced opacity, together with the visual confusion of seeing two versions of your image at different opacities, may well limit the number of Photoshop users who are prepared to use this palette.

9. Vanishing Point (IMPROVED)
I was very impressed with this feature when it arrived with CS2, but 18 months later I can count the number of images I have needed to edit in perspective on one hand. I have belatedly realized that its primary strength is for overlaying two-dimensional images, or graphics over images that contain regular and very accurate planes of perspective, e.g. a label over a box.

I saw the demo movies about moving a window onto another wall of the building and was inspired to create surrealistic cityscapes. The reality however is that you can’t move windows, doors or any other object that was photographed at a specific distance from your lens, further back or further forward, along the plane of perspective as the angle of view to this object then appears unrealistic. I also found that you have to be incredibly lucky to be able to retouch a surface as it recedes into the distance, with texture or detail taken from the foreground. Usually the inaccuracies of any repeating pattern or inconsistencies of ambient light preclude this editing technique. The newly improved Vanishing Point cannot hope to make any advances in this department, but what it can now do (I didn’t know it couldn’t do it in CS2 as I am not a graphic designer, or into product packaging) is create additional planes that are not 90 degrees to the original plane or surface created.

Conclusion
Photomerge, Curves, Black & White and Smart Filters are the new features that will impact most on my own workflow. These features herald increased efficiency and flexibility. Together with Bridge and ACR 4.0, I would have to rate this as a significant new version of Photoshop. It is perhaps feasible to imagine living without any of the new tools and techniques on offer in Photoshop CS3 beta release, but if you have been working on Location with a G4 PowerBook and now own a MacBook or MacBook Pro the speed of this beta alone will win you over. And that my friends, is the only reason we have this beta release in the first place.


DIGITAL PHOTO OF THE DAY

HUMAN INTEREST PHOTOGRAPHY
Photo by: http://solihin-photo.blogspot.com

Camera : Canon EOS 350D DIGITAL
Shutter speed : 1/60
Aperture Value : 13.0
ASA/ISO : 100
Flash : off
Lens : 18 - 55 mm
Exposure bias value: 0
Location : Keranji, Lamongan, East Java, Indonesia

Editor note: Foto disamping menggambarkan sebuah aktifitas keseharian nelayan sedang menjemur ikan-ikan hasil tangkapannya. Kadang para nelayan tidak mau difoto, karena itu sebelum memotret mereka sebaiknya melakukan pendekatan lebih dulu.

Friday, March 16, 2007

DIGITAL PHOTO OF THE DAY

LANDSCAPE PHOTOGRAPHY
Photo by: solihin-photo.blogspot.com

Camera : Canon Powershot S1 IS
Shutter Speed : 1/200
Aperture Value : 8.0
Flash : off
ASA/ISO : 100
Location : Kenjeran Beach, Surabaya, East Java, Indonesia

Editor Note: Kali ini memotret sunrise atau matahari terbit yang sangat menarik diabadikan. Anda perlu sabar menunggu sunrise atau sunset. Berilahforeground atau latar depan untuk menambah dramatis dan kedalaman foto. Pakailah ASA kecil dan diafragma kecil untuk mendapatkan ketajaman dan warna matahari terbenam atau terbit. Foto diatas memakai kamera digital pocket, bagaimana kalau memotret dengan digital camera SLR? Tentunya akan lebih bagus lagi bila anda menguasai teknik fotografi. Terus berkarya....

YANG PERLU KAMU TAHU TENTANG KOMPOSISI

Komposisi bisa diartikan cara menata elemen-elemen dalam gambar yng mencakup garis, shape, form, warna, terang dan gelap. Aspek komposisi yang utama adalah menghasilkan visual impact- sebuah kemampuan untuk menyampaikan perasaan yang anda inginkan untuk berekspresi dalam foto anda. Ini berarti anda perlu menata sedemikian rupa komposisinya agar tujuan anda tercapai, apakah itu untuk menyampaikan kesan statis dan diam atau sesuatu mengejutkan, beda, eksentrik. Dalam komposisi klasik selalu ada satu titik perhatian yang pertama menarik perhatian. Hal ini terjadi karena penataan posisi, subordinasi, kontras cahaya atau intensitas subjek dibandingkan sekitarnya atau pengaturan sedemikian rupa yang membentuk arah yang membawa perhatian pengamat pada satu titik.

Komposisi klasik yang baik memiliki proporsi yang menyenangkan. Ada keseimbangan antara gelap dan terang, antara bentuk padat dan ruang terbuka atau warna-warna cerah dengan warna-warna redup. Pada kesempatan-kesempatan tertentu, bila dibutuhkan mungkin anda akan membutuhkan komposisi anda seluruhnya simetris. Seringkali gambar yang anda buat lebih dinamis dan secara visual lebih menarik bila anda menempatkan subjek ditengah. Anda harus menghindari sebuah garis pembagi biarpun itu vertikal. Untuk menghindari sebuah gambar yang dinamis diperlukan juga kehadiran irama. Irama ini terjadi karena adanya pengulangan berkali-kali sebuah objek yang berukuran kecil. Kehadiran irama dalam gambar mengesankan adanya suatu gerakan.

1. Garis
Fotografer yang baik kerap menggunakan garis pada karya-karya mereka untuk membawa perhatian pengamat pada subjek utama. Garis juga dapat menimbulkan kesan kedalaman dan memperlihatkan gerak pada gambar. Ketika garis-garis itu sendiri digunakan sebagai subjek, yang terjadi adalah gambar-gambar menjadi menarik perhatian. Tidak penting apakah garis itu lurus, melingkar atau melengkung, membawa mata keluar dari gambar. Yang penting garis-garis itu menjadi dinamis.

2. Shape
Salah satu formula paling sederhana yang dapat membuat sebuah foto menarik perhatian adalah dengan memberi prioritas pada sebuah elemen visual. Shape adalah salah satunya. Kita umumnya menganggap shape sebagai outline yang tercipta karena sebuah shape terbentuk, pada intinya, subjek foto, gambar dianggap memiliki kekuatan visual dan kualitas abstrak. Untuk membuat shape menonjol, anda harus mampu memisahkan shape tersebut dari lingkungan sekitarnya atau dari latar belakang yang terlalu ramai. Untuk membuat kontras kuat antara shape dan sekitarnya yang membentuk shape tersebut. Kontras ini dapat terjadi sebagai akibat dari perbedaan gelap terang atau perbedaan warna. Sebuah shape tentu saja tidak berdiri sendiri. Ketika masuk kedalam sebuah pemandangan yang berisi dua atau lebih shape yang sama, kita juga dapat meng-crop salah satu shape untuk memperkuat kualitas gambar.

3. Form
Ketika shape sendiri dapat mengindentifikasikan objek, masih diperlukan form untuk memberi kesan padat dan tiga dimensi. Hal ini merupakan faktor penting untuk menciptakan kesan kedalaman dan realitas. Kualitas ini tercipta dari bentukan cahaya dan tone yang kemudian membentuk garis-garis dari sebuah objek. Faktor penting yang menentukan bagaimana form terbentuk adalah arah dan kualitas cahaya yang mengenai objek tersebut.

4. Tekstur
Sebuah foto dengan gambar teksur yang menonjol dapat merupakan sebuah bentuk kreatif dari shape atau pattern. Jika memadai, tekstur akan memberikan realisme pada foto, membawa kedalaman dan kesan tiga dimensi ke subyek anda.
Tekstur dapat terlihat jelas pada dua sisi yang berbeda. Ada tekstur yang dapat ditemukan bila kita mendekatkan diri pada subyek untuk memperbesar apa yang kita lihat, misalnya bila kita ingin memotret tekstur permukaan sehelai daun. Ada pula saat dimana kita harus mundur karena subyek yang kita tuju adalah pemandangan yang sangat luas. Tekstur juga muncul ketika cahaya menerpa sebuah permukaan dengan sudut rendah, membentuk bayangan yang sama dalam area tertentu.
Memotret tekstur dianggap berhasil bila pemotret dapat mengkomunikasikan sedemikian rupa sehingga pengamat foto seolah dapat merasakan permukaan tersebut bila menyentuhnya. Sama seperti pattern, tekstur paling baik ditampilkan dengan beberapa variasi dan nampak melebar hingga keluar batas gambar.

5. Patterns
Pattern yang berupa pengulangan shape, garis dan warna adalah elemen visual lainnya yang dapat menjadi unsur penarik perhatian utama. Keberadaan pengulangan itu menimbulkan kesan ritmik dan harmoni dalam gambar. Tapi, terlalu banyak keseragaman akan mengakibatkan gambar menjadi membosankan. Rahasia penggunaan pattern adalah menemukan variasi yang mampu menangkap perhatian pemerhati. Pattern biasanya paling baik diungkapkan dengan merata. Walaupun pencahayaan dan sudut bidikan kamera membuat sebuah gambar cenderung kurang kesan kedalamannya dan memungkinkan sesuatu yang berulangkali menjadi menonjol.

Dengan prinsip-prinsip komposisi di atas, berikut ini adalah beberapa jenis yang dapat anda gunakan :
Rule of thirds
Bayangkan ada garis-garis panduan yang membentuk sembilan buah empat persegi panjang yang sama besar pada sebuah gambar. Elemen-elemen gambar yang muncul di sudut-sudut persegi panjang pusat akan mendapat daya tarik maksimum.
Format : Horizontal atau Vertikal
Proporsi empat persegi panjang pada viewinder memungkinkan kita untuk melakukan pemotretan dalam format landscape/horizontal atau vertikal/portrait. Perbedaan pengambilan format dapat menimbulkan efek berbeda pada komposisi akhir. Lihatlah pada jendela bidik secara horizontal maupun vertikal dan tentukan keputusan kreatif untuk hasil terbaik.
Satu Titik
Buatlah satu titik yang menarik perhatian dalam gambar. Sangat sulit bagi orang yang melihat sebuah foto apabila terlalu banyak titik yang menarik perhatian. Umumnya makin ‘ramai’ sebuah gambar, makin kurang menarik gambar itu. Cobalah berkonsentrasi pada satu titik perhatian dan maksimalkan daya tariknya.

Picture scale
Sebuah gambar yang nampak biasa namun menjadi menarik karena ada sebuah titik kecil yang menarik perhatian. Dengan pemotretan landscape atau monument, kembangkan daya tarik pemotretan dengan menambahkan obyek yang diketahui besarnya sebagai titik perhatian untuk memberikan kesan perbandingan skala.
Horizons
Merubah keseimbangan langit dan tanah dapat mengubah pemandangan gambar secara radikal. Bila gambar hampir dipenuhi oleh langit akan memberikan kesan polos terbuka dan lebar tapi bila langit hanya disisakan sedikit di bagian atas gambar, akan timbul kesan penuh.
Leading lines
Garis yang membawa mata orang yang melihat foto ke dalam gambar atau melintas gambar. Umumnya garis-garis ini berbentuk : Garis-garis yang terlihat secara fisik misalnya marka jalan atau tidak terlihat secara langsung misalnya bayangan, refleksi.
Berbeda
Barangkali ada bidikan-bidikan lain yang dapat diambil selain pendekatan dari depan dan memotret paralel ke tanah. Bergerak mendekat dari yang diduga seringkali menghasilkan efek yang menarik.
Colour
Membuat bagian dari gambar menonjol dari background. Cara utama untuk memperoleh hal ini adalah memperoleh subyek yang warna atau nadanya berbeda secara radikal dengan background.
Framing
Bila subyek secara khusus mempunyai bentuk yang kuat, penuh frame dengan subyek. Baik itu dengan cara menggunakan lensa dengan fokus lebih panjang atau bergerak mendekati subyek.
Shooting position
Ketika kita merasa jenuh dengan komposisi yang itu-itu saja, cobalah meurbah sudut pandang sepenuhnya. Misalnya posisi duduk ke posisi berdiri atau pengambilan bidikan dari atas atau bawah dari subyek.
Number of subject
Pemotretan dengan banyak subyek yang relatif seragam, kurang menarik dari pandangan komposisi. Temukanlah salah satu subyek yang ‘berbeda’ diantara sekian banyak subyek tersebut. Berbeda diartikan berbeda gerakan, bentuk dan warna.

Wednesday, March 14, 2007

DIGITAL PHOTO OF THE DAY

LANDSCAPE
PHOTOGRAPHY
Photo by: http://solihin-photo.blogspot.com

Camera : Canon Poweshot A300
Exposure mode : Auto
Aperture/f : 5.6
Shutter Speed : 1/1600
ASA/ISO : 400
Flash : flash did not fire (off)
Location : Bande Alit Beach, Meru Betiri National Park, Jember, East Java, Indonesia.

Editor Note :
Fotografi Landscape merupakan cabang fotografi untuk foto-foto pemandangan alam. Dari data diatas, sebaiknya bila memotret foto landscape menggunakan mode exposure Manual dengan menyetting diafragma kecil bisa 11, 16, 22 dan shutter speed mengikuti dari pemilihan diafragma. Sementara ASA/ISO gunakan 100. Gunakan lensa lebar bila ingin mendapatkan bidang pemandangan yang luas. Terus berkarya....

REVIEW DIGITAL CAMERA

Canon EOS 400D with EF-S 18-55mm F/3.5-5.6 II

Canon camera EOS 400D representing development of technology of previous camera that is canon EOS 350D. Following its features about EOS 400D which I earn from site canon.


Stunning quality, inspired design. Creative photography has never been easier.
· 10.1 Megapixel CMOS sensor and DiG!C II for stunning professional quality photographs
· Ultra compact, light weight and super stylish design for creative picture taking fun
· Simple to use Mode Dial operation so anyone can enjoy shooting pictures like a pro
· Complete creative control options for the developing creative photographer
· Compatible with the full range of over 50 Canon EF lenses and Canon EX-series Speedlites

A Canon developed 10.1 Megapixel CMOS senor and DiG!C II combine to deliver stunning professional quality photographs. The ultra compact, light weight and super stylish design includes Canon's simple to use Mode Dial for creative photography and picture taking fun.

Stunning Quality, Inspired Design
· Canon developed 10.1 Megapixel CMOS sensor delivering stunning professional quality photographs
· DiG!C II image processor offering blazingly fast operation with clean, detail rich images
· Compact, light weight and super stylish design with Mode Dial for simplicity and creative fun
· Fast and responsive 9-point AF with continuous shooting at up to 3 fps of up to 27 shots
· EOS Integrated Cleaning System providing total protection from appearance of sensor dust in images

Creative Control, When it's Needed
· 5 Creative Zone modes selectable with the Command Dial for complete control
· Variable sensitivity between ISO 100 to ISO 1600 offering high levels of creative flexibility
· 35-zone Evaluative metering with user selectable metering patterns for high exposure accuracy
· Extensive exposure control including AE lock, compensation and bracketing
· Extensive White Balance control including Automatic, Preset, Bracketing, Correction and Custom
· Selectable colour space options of sRGB or Adobe RGB and in-camera processing parameters
Contains EOS 400D body & standard accessories (see below)
· Battery Pack NB-2LH, Battery Charger CB-2LT, Neck Strap EW-100DGR, Eyecup Ef, Camera Cover
R-F-3, USB Interface Cable IFC-400PCU and Video Cable VC-100
· ZoomBrowser EX (Win), Image Browser (Mac), PhotoRecord (Win), PhotoStitch (Win/Mac), Remote
Capture (Win/Mac), Digital Photo Professional (Win/Mac), Camera Window (Win/Mac), RAW Image Task (Win/Mac) and Arcsoft Studio (Win/Mac)

Optional Accessories
· AC Adapter Kit ACK-DC20 providing the ability to shoot powered directly from mains power supply
· Semi-Hard Case EH18-L accommodating for the body and the lens
· Battery Grip BG-E3 with vertical operation controls and housing dual NB-2LH Li-Ion battery packs
· Complete range of over 50 Canon EF lenses including L-series and Image Stabilizer lenses
· Canon EX-series Speedlites and the MR-14EX Macro Ring Lite and MR-24EX Macro Twin Lite
· Remote Switch RS-60E3, Remote Controller RC-1 and Remote Controller RC-5

Specification :
Image sensor : 10.1 Effective Megapixel CMOS sensor; 22.2 x 14.8mm effective size
Number of recording pixels : Large / Fine: 3888 x 2592 pixels (approx. 10.1 Megapixels)
Medium / Fine: 2816 x 1880 pixels (approx. 5.3 Megapixels)
Small / Fine: 1936 x 1288 pixels (approx. 2.5 Megapixels)
RAW: 3888 x 2592 pixels (approx. 10.1 Megapixels)
Sensitivity (equivalent film speed) : ISO 100, 200, 400, 800, 1600 (selectable via ISO Speed menu)
Image data storage : Compact FlashT (CF) card Type I or Type II standard; 1 slot
Image compression : Raw / Fine / Normal
Image compression level : Still image: JPEG or RAW - simultaneous recording possible
Lens : Canon EF and EF-S series, effective focal length 1.6x
Shutter : Vertical-travel, mechanical, focal plane shutter with electronic control
Shutter speed: 1/4,000 sec. - 30 sec., Bulb; maximum flash sync at 1/200 sec.
Focusing method : TTL-CT-SIR type. Wide area AF with 9 selectable focussing points.
Focusing modes : Autofocus (One-shot AF, Predictive AI Servo AF, One-Shot /Predictive AI Servo AF switching) and Manual Focussing
Light metering method : Evaluative, Partial, and Centre-weighted average metering
Metering range : EV1-EV20
White balance control : Auto, Daylight, Shade, Cloudy, Tungsten, Fluorescent, Flash and Custom
Shooting modes : Program AE, Shutter-priority AE, Aperture priority AE, Depth-of-field AE, Full Auto, Programmed Image Control modes (6), Manual, E-TTL II autoflash Program AE
Continuous shooting speed : 3 frames per sec for up to 27 in a single burst
Self timer : Yes - 10 seconds
Flash (built-in) : Auto pop-up, retractable, built-in flash in the pentaprism
Flash guide number (built-in) : 13 at 100 ISO (m)
Flash (external) : Hot-shoe: X-sync contacts, with EX-series Speedlites: E-TTL II autoflash
Optical viewfinder : Eye-level SLR (with fixed pentamirror)
Viewfinder adjustment : -3 to +1 dpt
Viewfinder coverage : 95% (vertically and horizontally)
Monitor type : 2.5" TFT colour, liquid crystal monitor - 230,000 pixels
File format : Complies to Design rule for Camera File standards
Interface : Digital Terminal: USB 2.0 Hi-Speed
Video Output Terminal: NTSC / PAL
Remote Control Terminal: E3-type
Wireless Remote Control for RC-1 and RC-5
Direct printing : Camera, compatible printer, dedicated cable
Power source : Rechargeable Lithium-ion battery (type: NB-2LH), AC adapter (type: ACK-700)
Operating environment : Temperature: 0° - 40° C; Humidity: 85% or lower
Dimensions (W x H x D) : 126.5 x 94.2 x 65mm
Weight : Approx. 510gms
Operating platforms - PC : Windows 98 SE, 2000, ME, XP
Operating platforms - MAC : Mac OS X 10.2 to 10.4

DIGITAL PHOTO OF THE DAY

Macro Photography
Photo by: Coleta

Camera : Kodak Z700 DIGITAL CAMERA
Shutter Speed : 1/20
Aperture/f : 3.4
Exposure Compensation: 0
ASA : 140
Image : 2304 x 1728
Flash : Flash not fire (off)

Editor Note: Dunia fotografi makro memang indah, yang mulanya kecil bisa menjadi nampak jelas di mata. Dengan kamera digital pocket pun kita bisa menghasilkan foto yang bagus, tidak harus dengan menggunakan kamera profesional. Seperti foto disamping hasil jepretan teman saya yang memotret binatang bekicot sedang berjalan di atas tumbuhan hijau (lumut) dengan digital pocket. Untuk bisa memotret seperti diatas, tentunya harus sabar menunggu sang bekicot berjalan sambil melihat sumber pencahayaannya, komposisi, dan backgroundnya. Tetap berkarya....

Sunday, March 11, 2007

HISTORY of CAMERA OBSCURA

Camera Obscura come word Camera (latin) is room and Obscura (Latin) is mean dark. Camera Obscura can be interpreted in a dark room at wall is given by a puncture. Go into a very dark room on a bright day. Make a small hole in a window cover and look at the opposite wall. What do you see? Magic! There in full color and movement will be the world outside the window — upside down! This magic is explained by a simple law of the physical world. Light travels in a straight line and when some of the rays reflected from a bright subject pass through a small hole in thin material they do not scatter but cross and reform as an upside down image on a flat surface held parallel to the hole. This law of optics was known in ancient times.

The earliest mention of this type of device was by the Chinese philosopher Mo-Ti (5th century BC). He formally recorded the creation of an inverted image formed by light rays passing through a pinhole into a darkened room. He called this darkened room a "collecting place" or the "locked treasure room.". Aristotle (384-322 BC) understood the optical principle of the camera obscura. He viewed the crescent shape of a partially eclipsed sun projected on the ground through the holes in a sieve, and the gaps between leaves of a plane tree.

Meanwhile the Islamic scholar and scientist Alhazen (Abu Ali al-Hasan Ibn al-Haitham) (c.965 - 1039) gave a full account of the principle including experiments with five lanterns outside a room with a small hole. In 1490 Leonardo Da Vinci gave two clear descriptions of the camera obscura in his notebooks. Many of the first camera obscuras were large rooms like that illustrated by the Dutch scientist Reinerus Gemma-Frisius in 1544 for use in observing a solar eclipse.

The image quality was improved with the addition of a convex lens into the aperture in the 16th century and the later addition of a mirror to reflect the image down onto a viewing surface. Giovanni Battista Della Porta in his 1558 book Magiae Naturalis recommended the use of this device as an aid for drawing for artists. The term "camera obscura" was first used by the German astronomer Johannes Kepler in the early 17th century. He used it for astronomical applications and had a portable tent camera for surveying in Upper Austria.

The development of the camera obscura took two tracks. One of these led to the portable box device that was a drawing tool. In the 17th and 18th century many artists were aided by the use of the camera obscura. Jan Vermeer, Canaletto, Guardi, and Paul Sandby are representative of this group. By the beginning of the 19th century the camera obscura was ready with little or no modification to accept a sheet of light sensitive material to become the photographic camera.

The other track became the camera obscura room, a combination of education and entertainment. In the 19th century, with improved lenses that could cast larger and sharper images, the camera obscura flourished at the seaside and in areas of scenic beauty. There are several pages that features images of camera obscura rooms such as this page on US park camera obscuras from our collection. Today the camera obscura is enjoying a revival of interest. Older camera obscuras are celebrated as cultural and historic treasures and new camera obscuras are being built around the world.